Flushing your car’s radiator is a crucial maintenance task that helps keep the engine cool and operating efficiently. Over time, coolant degrades and becomes contaminated with rust, scale, and debris, which can clog the radiator and reduce its ability to dissipate heat. A coolant flush not only removes old antifreeze but also clears out accumulated gunk, ensuring the cooling system works effectively.
This detailed guide will walk you through everything you need to know to perform a DIY radiator flush safely and effectively at home.
Why Radiator Flushing Is Important

Radiator flushes are essential for several reasons:
-
Prevents overheating: A clean cooling system is more efficient.
-
Extends radiator and engine life: Prevents corrosion and blockages.
-
Maintains proper coolant pH: Reduces wear on water pumps and gaskets.
-
Improves heat transfer: Keeps the engine at an optimal operating temperature.
Recommended flush intervals are typically every 2-3 years or 30,000 to 50,000 km, but always check your owner’s manual for specific guidelines.
Tools & Materials You’ll Need
| Tool/Item | Purpose |
|---|---|
| New Coolant | To refill the system with fresh antifreeze |
| Distilled Water | For flushing and mixing with coolant |
| Radiator Flush Cleaner | Helps loosen rust and deposits |
| Drain Pan | To catch old coolant |
| Funnel | Easier and cleaner coolant pouring |
| Hose or Water Supply | For rinsing the radiator |
| Gloves & Eye Protection | For safety when handling chemicals |
| Socket Wrench or Screwdriver | To remove radiator drain plug and clamps |
| Owner’s Manual | To locate drain plug and know coolant specs |
Step-by-Step Coolant Flush Instructions
Follow these steps carefully to flush your radiator and refill it with fresh coolant.
1. Allow Engine to Cool
Never attempt to flush a hot radiator. Let the car sit for at least an hour to avoid burns or injury from pressurized hot coolant.
2. Locate the Radiator Drain Plug
Consult your owner’s manual to find the radiator drain plug, usually located at the bottom of the radiator.
3. Drain Old Coolant
-
Place the drain pan under the radiator.
-
Open the drain plug or remove the lower radiator hose to let coolant flow out.
-
Remove the radiator cap to speed up the draining process.
Tip: Dispose of old coolant responsibly. It’s toxic and must be taken to a recycling center or auto parts store that accepts coolant waste.
4. Flush with Water
-
Close the drain plug and fill the radiator with distilled water.
-
Run the engine for 10–15 minutes with the heater on high to circulate the water.
-
Turn off the engine and let it cool.
-
Drain the system again completely.
Repeat this process until the drained water runs clear.
5. Optional: Use a Radiator Flush Cleaner
If your system is heavily contaminated:
-
Add a commercial radiator flush cleaner with water.
-
Follow the product’s instructions (usually run for 10–20 minutes).
-
Drain and flush with clean distilled water afterward.
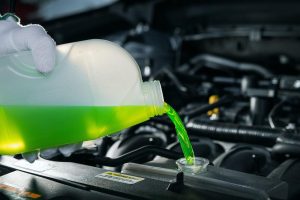
6. Refill with New Coolant
Once the system is clean:
-
Mix new coolant and distilled water (typically 50/50, or as recommended).
-
Use a funnel to refill the radiator.
-
Start the engine and run it with the radiator cap off, allowing air bubbles to escape.
-
Top off as the level drops and replace the radiator cap once steady.
7. Bleed the Cooling System
Some cars have bleed valves to remove trapped air. If not, you can “burp” the system by:
-
Parking on an incline (nose up)
-
Running the engine with the cap off
-
Squeezing the upper radiator hose to help air escape
Trapped air can lead to overheating, so make sure to perform this step carefully.
8. Check for Leaks and Monitor Temperature
-
Check under the car and around hose connections for any leaks.
-
Monitor engine temperature during your next drive.
-
Recheck coolant level after 1–2 days and top off if needed.
Coolant Types and Compatibility
Using the correct coolant is essential. Below is a basic overview:
| Coolant Type | Color | Vehicle Compatibility |
|---|---|---|
| Inorganic Acid (IAT) | Green | Older vehicles (pre-2000) |
| Organic Acid (OAT) | Orange/Pink/Blue | Modern vehicles (longer life) |
| Hybrid Organic (HOAT) | Yellow/Turquoise | Mix of IAT and OAT; used by some OEMs |
Never mix incompatible coolant types, as this can cause chemical reactions and sludge formation.
Signs You Need a Coolant Flush
If you’re unsure whether a flush is needed, watch for these symptoms:
-
Engine running hotter than normal
-
Discolored or sludgy coolant
-
Sweet or musty odor from vents
-
Rust flakes in coolant reservoir
-
Cooling system leaks or corrosion
Safety Tips
-
Always work on a cooled-down engine.
-
Wear gloves and eye protection.
-
Keep pets and children away from coolant.
-
Dispose of used coolant properly — never pour it down the drain.
Where to Buy Radiator & Components Online
Need new radiator parts or coolant? For a wide selection of high-quality radiators, caps, hoses, and other cooling components, visit:
Buy Radiator & Components online
Whether you’re upgrading for performance or just maintaining your daily driver, you’ll find parts compatible with your make and model.
Conclusion
A radiator flush is a relatively simple DIY maintenance task that can drastically improve your vehicle’s cooling performance and prevent costly repairs. With the right tools, some patience, and this step-by-step guide, you can keep your engine cool and healthy for the long haul.
Flushing your cooling system every couple of years helps ensure your radiator, hoses, and water pump operate at peak efficiency. Stay ahead of overheating issues and enjoy smoother driving by taking care of your radiator the right way.
Ready to gear up?
Buy Radiator & Components online