A properly functioning radiator is essential to your vehicle’s cooling system. It ensures that the engine runs at an optimal temperature, preventing overheating and serious mechanical failures. However, even a small leak in the radiator can compromise the cooling system’s efficiency and eventually lead to costly engine damage. That’s why performing a radiator pressure test is one of the most reliable ways to detect hidden leaks early.
In this article, we’ll explain what a radiator pressure test is, why it’s important, and how to perform one step-by-step — both at home and professionally. We’ll also cover the tools you’ll need, signs of potential leaks, and when it’s time for a full replacement.
Why Pressure Testing a Radiator Matters
A radiator circulates coolant through the engine to absorb excess heat and maintain a stable operating temperature. Over time, exposure to heat cycles, vibration, corrosion, and road debris can cause cracks, gasket failures, or loose hose connections.
A pressure test helps identify:
-
Small leaks that are hard to see during normal operation.
-
Weak spots in hoses or seams before they burst under pressure.
-
Defective caps or fittings that cause loss of coolant.
-
Air leaks that reduce coolant efficiency.
Ignoring these issues can lead to:
-
Overheating and engine seizure.
-
Reduced heater performance.
-
Continuous coolant loss.
-
Costly repairs or complete radiator replacement.
Common Signs of Radiator Leaks
Before performing a pressure test, check for visible symptoms of a failing radiator:
| Sign | Possible Cause | Severity |
|---|---|---|
| Coolant puddles under the car | Crack in radiator or hose | High |
| Sweet smell while driving | Coolant vapor from leaks | Medium |
| Rising temperature gauge | Reduced cooling efficiency | High |
| Rust or white deposits on radiator | Dried coolant residue | Medium |
| Low coolant level | Continuous leak or evaporation | High |
If any of these symptoms appear, it’s best to act quickly and test your radiator before further damage occurs.
Tools and Materials You’ll Need
To perform a radiator pressure test at home, gather the following:
-
Radiator pressure tester kit (includes pump, gauge, and adapters)
-
Coolant reservoir adapter (for vehicles with sealed systems)
-
Safety gloves and goggles
-
Clean rags
-
Flashlight
-
Coolant (for refill if needed)
Optional but useful:
-
UV dye and UV light for detecting micro-leaks.
-
Replacement clamps or seals in case of minor fixes.
Preparation Before Testing
Follow these steps to prepare your car for a pressure test safely:
-
Let the engine cool completely — Testing a hot system can cause burns or false readings.
-
Check coolant level — Ensure the radiator is filled to the top. Add coolant if necessary.
-
Inspect the cap and hoses — Look for cracks, corrosion, or loose connections.
-
Disconnect the battery (optional) — For extra safety when working near engine components.
-
Place protective sheets — Avoid coolant spills on belts or paint.
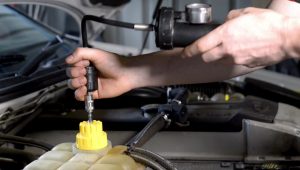
Step-by-Step Guide: How to Pressure Test a Radiator
You can perform a radiator pressure test in about 30–45 minutes using a standard pressure tester kit.
Step 1: Attach the Pressure Tester
-
Remove the radiator or coolant reservoir cap.
-
Connect the tester adapter to the opening.
-
Ensure the connection is airtight to avoid false readings.
Step 2: Pump the System
-
Use the hand pump to increase pressure in the system.
-
Check your vehicle manual for the recommended pressure (usually 13–16 psi for most cars).
-
Do not exceed the specified limit to prevent damage.
Step 3: Monitor the Gauge
-
Observe the pressure reading for about 2–3 minutes.
-
If the needle remains steady, the system is sealed.
-
If the pressure drops gradually, there’s a leak somewhere.
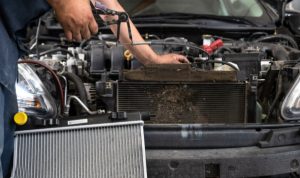
Step 4: Locate the Leak
Inspect these common leak points:
-
Radiator core and end tanks
-
Upper and lower radiator hoses
-
Hose clamps and fittings
-
Water pump and thermostat housing
-
Heater core connections
Use a flashlight or UV dye to pinpoint the source of the leak.
Step 5: Release Pressure and Reassemble
-
Slowly release the built-up pressure from the tester.
-
Remove the tester and reinstall the radiator cap.
-
Refill coolant if any was lost during testing.
Radiator Pressure Test Results Reference
| Gauge Behavior | Likely Issue | Next Step |
|---|---|---|
| Pressure holds steady | No leaks | System is sealed |
| Pressure drops quickly | Major leak (hose, gasket, crack) | Visual inspection and repair |
| Slow pressure drop | Minor leak or porous metal | Use UV dye for detection |
| Pressure fluctuates | Cap or seal failure | Replace radiator cap |
| Bubbles in coolant | Head gasket issue | Professional diagnosis recommended |
DIY vs. Professional Testing
| Aspect | DIY Testing | Professional Testing |
|---|---|---|
| Cost | Low (tester kits are affordable) | Moderate to high |
| Accuracy | Good for visible leaks | High — uses advanced tools |
| Time | 30–45 minutes | 15–30 minutes |
| Safety | Requires caution | Done in a controlled environment |
| Ideal for | Routine maintenance | Complex or hidden leaks |
If the leak source isn’t obvious, or you suspect internal damage (like a blown head gasket), professional testing is the safer option.
Preventing Future Radiator Leaks
To extend radiator life and avoid repeat issues, follow these maintenance tips:
-
Use the correct coolant type — Mixing incompatible coolants can cause corrosion.
-
Flush the cooling system every 2–3 years — Prevents sediment buildup.
-
Inspect hoses and clamps regularly — Tighten or replace as needed.
-
Keep the radiator clean — Remove debris and bugs from the fins.
-
Replace worn caps and seals — These inexpensive parts often cause small leaks.
-
Monitor temperature gauge — A sudden rise may indicate system pressure loss.
For durable, high-quality replacement parts, you can Buy Radiator & Components online. You’ll find radiators, caps, hoses, and other essential components designed to maintain optimal cooling performance.
Common Mistakes to Avoid
| Mistake | Result | Prevention Tip |
|---|---|---|
| Testing while engine is hot | Burns or incorrect readings | Wait until engine is cool |
| Overpressurizing the system | Damaged seals or hoses | Stay within recommended PSI |
| Ignoring minor leaks | Major future damage | Repair immediately |
| Using incorrect adapters | False results | Use vehicle-specific tester |
| Not refilling coolant | Overheating | Always top up after test |
When to Replace the Radiator
You should consider a full radiator replacement if you notice:
-
Multiple cracks or corrosion on the tank.
-
Repeated pressure loss despite repairs.
-
Blocked fins or internal rust.
-
Persistent overheating even after maintenance.
A new radiator ensures proper engine cooling and prevents costly breakdowns.
Conclusion
A radiator pressure test is one of the simplest yet most effective ways to detect leaks early and protect your engine from overheating. With the right tools and careful attention to detail, you can identify small issues before they become serious — saving time and money.
By following the steps above and maintaining your cooling system regularly, you’ll ensure your vehicle runs efficiently and safely in all conditions.
If you’re looking to replace or upgrade your cooling components, Buy Radiator & Components online — where you can find quality parts for reliable and long-lasting performance.